Low FODMAP Simple Salmon Cakes

I’d almost given up on salmon cakes. The recipes I’d tried in the past always seemed to deliver dry fish-flavored pucks. It occurred to me that Maryland crab cakes are usually moist with a light crust. Fish and crab behave similarly in the kitchen. Why not try making salmon cakes the same way? As it turns out, the results were pretty good.

A plate piled with salmon cakes and lemon wedges

There’s a lot of debate as to exactly what constitutes an authentic Maryland crab cake, but the most basic crab cake is simply lump crab meat mixed with a little mayo and mustard with some kind of starchy binder mixed with egg. The trick to making it delicious is to keep it simple. Preparing salmon in a similar fashion results in an inexpensive, quick meal or an easy appetizer.

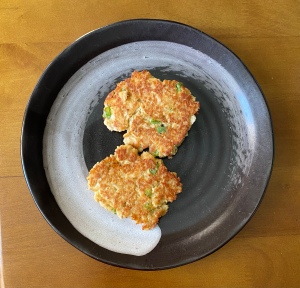
This recipe was developed with canned salmon in mind. Be aware that some types of canned salmon contain skin and bones. They are soft and edible but some people dislike the texture. If you prefer no skin or bones, be sure to read the packaging carefully. Look for the labels ‘boneless’ or ‘deboned’. You can of course use any leftover salmon fillets you may have on hand. The rest of the ingredients are usually found around most kitchens, making this an ideal ‘pantry meal’. The resulting salmon cakes are light and moist. They’re great on their own, but some folks prefer theirs with a bit of sauce. Try low FODMAP Tartar Sauce, Basil-Balsamic Mayo or serve with eggs and 2-Minute Hollandaise Sauce.

Feeling a little spicy? Take your salmon cakes to the next level by introducing seasonings and fresh vegetables. Check out the Variation section for how to make a less simple salmon cake.


Low FODMAP Simple Salmon Cakes

Makes 8 small cakes or 2-3 servings.

Ingredients

  • 10 oz cooked salmon (2 5 oz cans)
  • 6 tbsp gluten-free panko
  • 2 tbsp real mayonnaise (Best Foods/Hellmans recommended)
  • 1 tsp Dijon mustard
  • 1/8 tsp of Worcestershire
  • pinch sea salt
  • freshly ground pepper to taste
  • 1 egg, beaten
  • 1 tablespoon avocado oil (or other neutral oil)
  • lemon wedges for serving (optional)

Instructions

  1. Combine the panko, mayonnaise, mustard, Worcestershire sauce, salt, and pepper in a mixing bowl. Drain the salmon well and gently stir in, leaving some large chunks of fish. Add enough egg to be able to form patties that stick together and mix until even. If it becomes too runny, add a little more panko.
  2. Divide the salmon mixture in half, then repeat 2 more times so that there are 8 equal portions. Form each portion into a small cake about an inch tall.
  3. Heat a nonstick or cast-iron pan over medium heat. Add the avocado oil. When hot, add the cakes to the pan and cook until golden brown, about 2 minutes per side. Do not overcook. Remove cakes to a plate lined with paper towels.
  4. Serve hot, with or without sauce, accompanied by lemon wedges.

Troubleshooting

Having trouble with cakes that don’t hold together? Let’s figure out why.

  • Too chunky – it’s great to leave larger chunks of fish for texture, but there must be enough fish mashed with the panko and eggs to hold together. Try leaving fewer chunks.
  • Too dry – there must be the right amount of beaten egg in order for the mixture to hold together. Add a little bit of egg at a time, mixing well, until you can form a patty.
  • Too wet – sometimes there’s too much egg and it becomes too wet to hold shape. In this case add small amounts of panko until the mixture becomes sticky enough to hold together.
  • Don’t overdo it – if you wind up adding a lot of egg and panko, this can cause the resulting fish cakes to become dense and heavy. Use a light touch when adding egg or panko.

Variation

  • Old Bay Salmoncakes – Try adding 2 tbsp finely diced red bell pepper, 1 tbsp of finely chopped scallions (green parts only), 1 tsp fresh parsley and 1/4 tsp of Old Bay seasoning blend (if tolerated, contains capsaicin).
Two salmon cakes on a plate
Old Bay Salmoncakes. I only wish I’d used red bell pepper instead of green.

Low FODMAP Chicken Shogayaki (生姜焼き)

Shogayaki is rumored to have originated in Ginza, a neighborhood in Tokyo, some time in the 1940s. It was a dish meant to be prepared quickly and in large quantities. Typically made with various cuts of pork, it’s the second most popular dish in Japan. (Tonkatsu is #1). Shoga (生姜) means ginger and yaki (焼き) means grill or fry – an accurate description of this gingery, often-sweet dish flavored with mirin and soy sauce. Traditionally it was made with lots of onions, but they are not a requisite part of the dish these days.

A bowl of Chicken Shogayaki with rice

Today there are countless variations of this dish, including some made with other meats. Regardless of what the specific ingredients are, shogayaki is always quick and easy to make. For my version I chose to use chicken thighs since I almost always have some on hand. Chicken breast would work equally well if that is your preference. You can leave out the sugar if you prefer a more savory dish. Shogayaki is almost always accompanied by undressed shredded cabbage, which helps cleanse the palette between bites of meat. Serve with hot Japanese rice.


Low FODMAP Chicken Shogayaki (生姜焼き)

Makes 4 servings.

Ingredients

  • 1 lb boneless skinless chicken thighs, thinly sliced
  • 1 tbsp avocado oil or other neutral oil
  • 2 tsp ginger, finely grated
  • 2 tbsp mirin
  • 3 tbsp Japanese soy sauce
  • 1-2 tsp cane sugar
  • 2 cups finely shredded cabbage for serving
  • hot Japanese rice for serving

Instructions

  1. Combine grated ginger, mirin, soy sauce and sugar in a small bowl to create the sauce. Set aside.
  2. Heat a cast iron skillet over high heat. Add the oil. When it is hot, add the chicken and cook until it is no longer pink. Add the sauce and continue to cook until sauce is thickened, 4-5 minutes.
  3. Remove from heat, divide into four portions and serve alongside hot white rice and shredded cabbage.

Low FODMAP Poached Chicken with Ginger Sauce

Makes 4 servings.

When I am recovering from digestive incidents, I’ve found that certain foods are gentler on the stomach than others. Generally I prefer easy-to-digest animal proteins like lean meat, fish and eggs. I avoid fatty foods (like bacon or rib eye) as fat can negatively affect gut motility. I also avoid meals with a huge ingredient list. And like many people, ginger offers me a bit of digestive relief so I try to include it when I can.

In addition to hard boiled eggs, my favorite ‘gentle’ meals are Egg Drop Soup (especially if it’s cold and rainy), Salmon Ginger Sesame Salad (especially if I don’t feel like cooking), and Poached Chicken with Ginger Sauce (especially when I want something I can pick at over time). All help ease me back into eating solid foods.

A small bowl with a portion of chicken with ginger sauce

This type of ginger sauce is typically served over steamed fish in some Asian cuisines, but it’s delicious over shredded chicken as well. Despite its simplicity, it packs a lot of flavor. Feel free to add more ginger or soy sauce, according to your tastes and tolerance. On days you can tolerate rice, serve with hot jasmine rice.

Poached Chicken Ingredients

  • 1 lb skinless boneless chicken thighs
  • 4 1/8” thick slices peeled ginger
  • 2 scallions, chopped into thirds (green part only)
  • pinch of salt

Poached Chicken Instructions

  1. Add chicken thighs, ginger, scallions and salt to a medium pot. Cover with cool water by an inch or two. Place the pot over medium heat and heat until it comes to a low simmer. This will take about 25 minutes. For the most tender poached chicken, don’t try to rush this step.
  2. When the liquid reaches a simmer, turn down the heat to low and cook uncovered 10 to 15 minutes. If desired, skim the foam from the pot. The chicken is done when a thermometer inserted into the thickest part of the chicken reads at least 165F.
  3. Reserve 1/2 cup of the cooking liquid. Remove chicken pieces to a plate or bowl and shred with 2 forks. Mound the chicken on a serving plate, cover and set aside.

Sauce Ingredients

  • 3 scallions (green parts only)
  • 2 tbsp soy sauce
  • 1/2 tsp sugar
  • 1/2 cup cooking liquid (water the chicken was cooked in)
  • 2 tbsp ginger, minced

Sauce Instructions

  1. To make the sauce, add soy sauce, sugar and 1/2 cup cooking liquid. Stir and bring it to boil. Add in the ginger and chopped scallion greens. Bring to a boil again, uncover the shredded chicken snd pour the sauce over it. Serve with alone or with hot jasmine rice.

Low FODMAP Seattle-Style Teriyaki Chicken

A photo of teriyaki, rice and salad on a white plate.

Seattle is blessed with its own signature style of teriyaki. You can find teriyaki restaurants in great abundance throughout the region. This style of teriyaki differs from true Japanese teriyaki in that it is made without apples, which are high in FODMAPs. That makes it easier to adapt to a low FODMAP diet.

Pair with fresh hot rice and salad for a complete meal. Teriyaki places usually serve salads with either a tangy poppyseed dressing or a mayo-sesame Japanese-style dressing (my favorite). Find recipes for both in my Asian salad dressing recipes.

Please keep an eye on your shoyu (soy sauce) intake. There are 3 teaspoons of soy sauce per thigh. Monash says that up to 2 tablespoons of soy sauce is tolerated by most.


Low FODMAP Seattle-Style Teriyaki Chicken

Makes 4 servings.

Ingredients

  • 1 lb boneless skinless chicken thighs
  • 1/3 cup shoyu (Japanese soy sauce)
  • 3 tbsp cane sugar
  • 2 tbsp mirin
  • 1 tbsp garlic-infused olive oil
  • 1 (1”) piece ginger, peeled and thinly sliced
  • hot cooked jasmine rice or Japanese short grain rice for serving
  • up to 2 cups chopped romaine lettuce

Instructions: Teriyaki Sauce

  1. Bring soy sauce, sugar and mirin to a boil in a small sauce pan over medium high heat, stirring to dissolve the sugar. Remove from heat and allow to cool completely.

Instructions: Marinade

  1. Prepare the marinade by combining 1/4 cup of above teriyaki sauce along with the garlic-infused olive oil and ginger in a blender and process until smooth, about 20 seconds. Reserve the remaining teriyaki sauce for serving.
  2. Add chicken and marinade to a covered dish and marinate 1-24hrs.

Instructions: Broil the Chicken

  1. Prepare oven for broiling by positioning the rack so the meat will be 4-6” from the heating element. (It can be further away – up to 8 inches – but you must increase the cooking time.) Broil ~10 minutes on one side only, so that a nice char develops and the chicken is at least 165F throughout.
  2. Remove the chicken to a cutting board. Cut into 1″ strips.
  3. Serve on a plate with hot white rice and a salad. Pour reserved teriyaki sauce over the chicken OR serve it on the side.

Perfect Popcorn on the Stovetop

Making popcorn on the stove is fun and it’s way easier than many people think. You can avoid the unhealthy fats, excessive sodium, preservatives, gluten and artificial flavorings found in microwave popcorn. Plus stove-popped popcorn is noticeably better-tasting with a lighter texture. The best part? Popcorn is low in FODMAPS. According to the Monash app, up to 7 cups of popcorn should be tolerated, making it something you can indulge in as you like.

A photo of popcorn
A close up look at popcorn made with Black Jewell kernels. Notice the snowy white color and tiny hulls.

Great popcorn starts with great popcorn kernels. Skip the traditional yellow or white corn kernels, which tend to be bland and result in hulls that get caught in your teeth. Instead select blue, red or black heirloom variety kernels known for flavorful, fluffy popcorn and their lack of hulls. My two favorite varieties are Black Jewell Original Black Popcorn Kernels and Los Chileros Blue Corn Popcorn Kernels.


Makes about 8 2.5-cup servings.

Ingredients

  • 1/4 cup coconut oil or avocado oil
  • 2/3 cup heirloom variety popcorn kernels
  • 3 tbsp real butter (or low FODMAP vegan spread)
  • sea salt to taste

Instructions

  1. Add the oil and 3 popcorn kernels to a stock pot with a lid. Cover and heat over medium-high heat until all 3 kernels pop. Remove the three popped kernels from the pot to prevent them from burning.
  2. Take the pot off of the burner and add the rest of the popcorn. Cover with lid. Lift the pot off the stove and carefully shake back and forth for about 30 seconds. This coats all the kernels with the oil and heats them evenly.
  3. Return the pot to the burner and allow to cook, shaking the pot occasionally until the popping slows down – about 2 minutes. Remove the lid carefully in case there are any last moment pops and pour the popcorn into a large bowl for serving.
  4. Return the pot to the burner and turn off the heat. Add the butter to the hot pot and allow it to melt. Be careful not to let it brown. Pour the melted butter over the popcorn, sprinkle with sea salt to taste and gently toss to combine.

Low FODMAP GF Stovetop Macaroni & Cheese

A photo of 2 white bowls filled with cheesy pasta

I have sworn off baked macaroni and cheese. It takes too long and it can be a bit fussy. This stovetop mac n’ cheese is easy and it takes only about 10 minutes start to finish. Add your own special ingredients like smoked salmon or a FODMAP safe portion of broccoli florets or change up the cheeses to make it your own.

Aged cheeses like cheddar and Parmesan don’t contain much lactose, making them tolerable for many people on the low FODMAP diet. Butter is also naturally low in lactose. That just leaves the milk, flour and pasta as sources of FODMAPs so this recipe calls for lactose free milk, rice flour and pasta made from rice and corn. For the best texture, grate the geese yourself as pre-shredded cheese contains anti-caking ingredients that hinder perfect melting. (Personally I’m fine with using pre-shredded. I’m just trying to feed myself. )


Makes 2 meal-sized portions or 4 side dish portions.

Ingredients

  • 1/2 lb uncooked low FODMAP elbow macaroni
  • 1 1/2 tbsp unsalted butter
  • 2 tbsp sweet rice flour
  • 1 1/3 cups lactose free whole milk
  • 1 tsp mustard powder
  • 1/4 tsp ground white pepper
  • 4 oz (1 cup) shredded sharp cheddar cheese
  • 2 oz (1/2 cup) Monterey Jack cheese
  • Sea salt to taste 1/8-1/4 tsp

Instructions

  1. Prepare macaroni in a large pot according to the directions on the package. Drain and set aside.
  2. Melt butter in the same saucepan over medium heat. Add sweet rice flour and whisk together. Cook 1-2 minutes. Do not allow it to brown. Slowly pour in milk, whisking briskly until smooth. Continue cooking over medium heat, whisking constantly, until milk mixture thickens. Remove from heat and whisk in shredded cheese. Add salt to taste.
  3. Add drained macaroni back to the pot and stir well. Serve immediately.

Low FODMAP GF Hawaiian Loco Moco

A photo of a white bowl filled with low FODMAP gravy, rice and hamburger topped with a fried egg on a white background

The year is 1949. A group of teenagers enters the Lincoln Grill in the Hawaiian town of Hilo and asks for an inexpensive meal. Thus is born the Loco Moco – a hamburger patty on a bed of rice, smothered in gravy. Within a few years, the dish was popular all over Hawaii and spawned many variations, including a version with a fried egg on top.

These days Loco Moco is found throughout Hawaii and is also enjoyed in Japan and the US mainland. Most commonly it’s made with Japanese short grain rice, but I prefer to use jasmine rice. Despite originally being conceived as a lunch dish, Loco Moco is popular at any time of day.


Makes 1 serving.

Ingredients

  • 1 frozen hamburger patty
  • 1 egg
  • 1 tablespoon unsalted butter
  • 1 tablespoon sweet rice flour
  • 1 tbsp oil
  • 1 cup water
  • 1 low FODMAP beef broth stick
  • 3 tsp shoyu (Japanese soy sauce)
  • 1/2 tsp Worcestershire sauce
  • 1 tsp low FODMAP ketchup
  • black pepper and sea salt
  • 1 scallion, green parts only, sliced
  • 1 cup cooked rice

Instructions

  1. Patty: Cook hamburger patty according to directions on box. Season lightly with salt and pepper.
  2. Gravy: In a small pot, melt the butter over medium-high heat. Add the sweet rice flour and whisk until a paste forms. Continue whisking until the roux turns light beige, about 3 minutes.
  3. Combine broth stick and water in a measuring cup and stir. Add shoyu, Worcestershire sauce and ketchup and mix well. In a slow and steady stream, whisk the broth mixture into the roux. Add a few grinds of black pepper. Continue to whisk until gravy has thickened and begins to bubble. If it becomes too thick, add a little water.
  4. Sunny Side Up Egg: Heat a small skillet on medium-low. Add oil and gently crack an egg into the pan. Cook for 3 minutes or until the whites are mostly set, with some still-runny whites near the yolks. Place a lid over the pan for a few seconds to set the whites if necessary. Be careful not to keep the lid on for too long or the yolk will cook, too.
  5. Assembly: Mound the rice on a plate or in a bowl. Place the cooked burger on the rice. Smother with the gravy. Lay the fried egg on top and garnish with some scallions.

Low FODMAP Avgolemono Soup

This simple egg, lemon and rice soup is mild and comforting. It’s also gentle on the stomach. Avgolemono has its roots in Sephardic Jewish cooking despite being considered a Greek dish. It varies greatly in the way it is prepared. Some versions are heartier, others more silky and light. This version leans towards the thinner side. It takes around 25 minutes total. It’s great for a quick lunch or even breakfast.

Avgolemono soup being ladled into a bowl.

Typically plain avgolemono soup is served as a side dish in Greek restaurants. It can be made into a more complete meal by adding meat, herbs and vegetables. Shredded poached chicken is a popular addition. Poach a chicken breast in the broth before using it to make this soup. Remove the chicken when it is done and set aside to cool while you prepare the soup. Add the shredded chicken just before serving.

Avgolemono can be made with all kinds of vegetables, but carrots seem to go especially well with it. I prefer to use escarole myself. Add chopped escarole after 15 minutes, about 5 minutes before adding the egg mixture.

Sumac is a tart, lemony spice commonly used in Mediterranean cooking. A light sprinkle will add color and a little punch. Fresh herbs can also provide color and flavor. Parsley, chives and dill are the most popular. Stir them in after removing from heat or top individual bowls with a small amount herbs.


Makes 4 servings.

Ingredients

  • 4 cups low-FODMAP chicken broth
  • 1/4 cup uncooked rice
  • 3 eggs
  • 3 tablespoons lemon juice
  • 1 boneless skinless chicken breast, poached (optional)
  • 2 cups chopped escarole (optional)
  • ground sumac (optional)
  • chopped fresh herbs such as parsley, chives, or dill (optional)

Instructions

  1. In a medium saucepan, bring the broth to a boil.
  2. Add rice and cook until tender but still al dente, about 20 minutes. Reduce heat to low and bring to a simmer.
  3. Meanwhile, whisk the eggs and lemon juice together in a bowl until smooth.
  4. Ladle about 1 cup of the hot broth into the egg-and-lemon mixture, then whisk to combine.
  5. Add the mixture back to the simmering saucepan. Stir just until the soup becomes opaque and thickens as the eggs cook, 1 to 2 minutes. Sprinkle with sumac and herbs if desired, and serve.

Simple Low FODMAP Pan-Roasted Chicken Thighs

When you can’t use aromatics like onions and garlic, texture becomes an extra important quality of food.  These chicken thighs are simple yet very satisfying due to their crispy skins. Serve promptly after cooking for crispiest skin. Pair with a green salad or roasted vegetables for an easy dinner.

A photo of 4 bone-in chicken thighs in a cast iron skillet

Makes 4 servings.

Ingredients

  • 4 skin-on, bone-in chicken thighs (about a pound)
  • Kosher salt and freshly ground black pepper
  • 1 tablespoon olive oil, butter or ghee

Instructions

  1. Preheat oven to 475°F. Season chicken with salt and pepper.
  2. Heat oil/fat in a 12″ cast-iron or heavy nonstick skillet over high heat until hot but not smoking. Nestle chicken in skillet, skin side down, and cook 2 minutes. Reduce heat to medium-high; continue cooking skin side down, occasionally rearranging chicken thighs and rotating pan to evenly distribute heat, until fat renders and skin is golden brown, about 12 minutes.
  3. Transfer skillet to oven and cook 13 more minutes. Flip chicken; continue cooking until skin crisps and meat is cooked through, about 5 minutes longer. Transfer to a plate; let rest 5 minutes before serving.