Low FODMAP Ceviche-Style Canned Fish Salad

I developed this recipe as an alternative to making tuna salad with mayonnaise. Ceviche is a Peruvian dish of raw fish mixed with vegetables and citrus juice. The citrus juice ‘cooks’ the fish. For our low spoons version we are using canned fish – tuna or salmon – and adding the fresh, tasty flavors of ceviche.

Fish salad in a small bowl

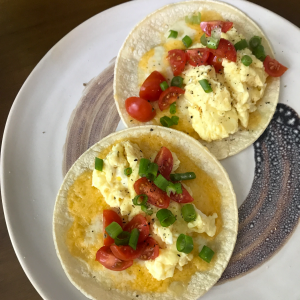
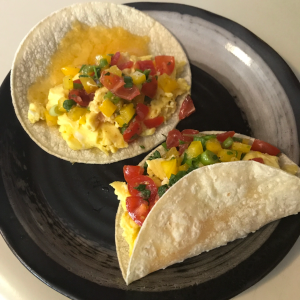
This ‘ceviche’ is fantastic on corn tortilla chips. You can buy them or make your own. You can of course also enjoy it on toasted low FODMAP bread or low FODMAP crackers. Also makes a yummy soft taco filling.


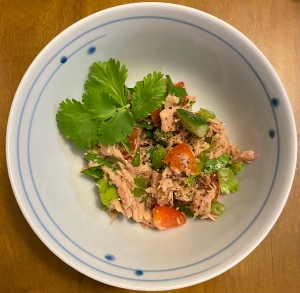
Low FODMAP Ceviche-Style Salmon Salad

Makes 6 servings

Ingredients

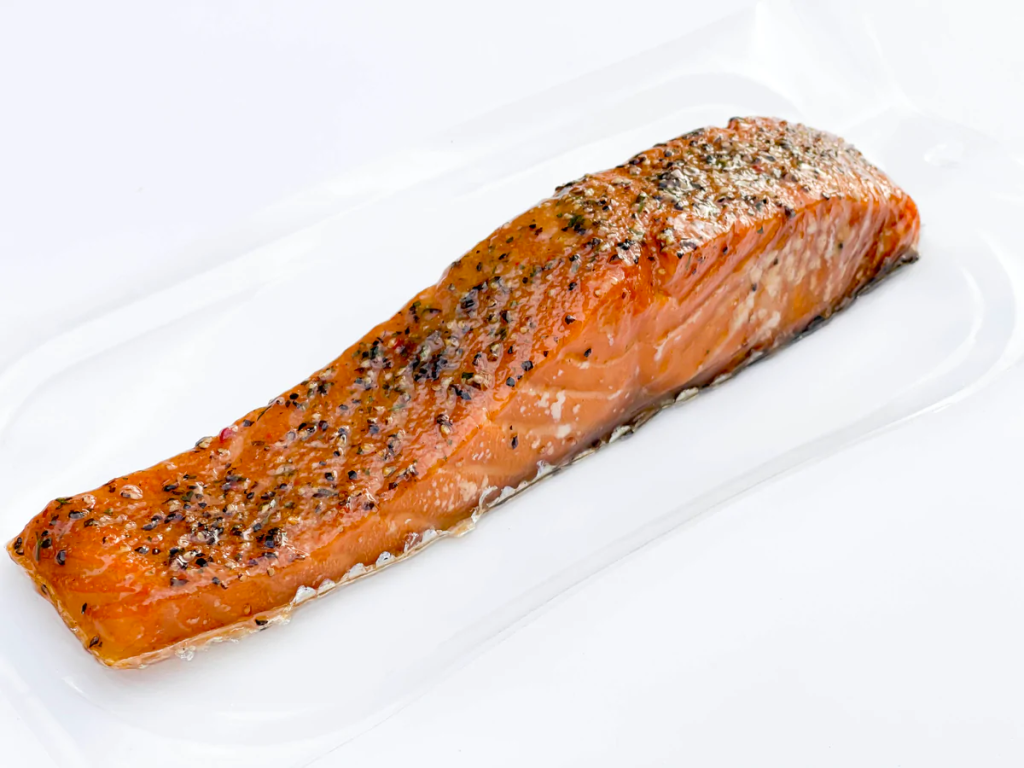
  • 2 (5-ounce) cans of salmon or tuna, drained
  • 1/4 cup scallions, chopped (green parts only)
  • 2 med tomatoes, seeded and chopped
  • 1 med green bell pepper, chopped
  • 1 small jalapeno pepper, finely diced (optional)
  • 1 English cucumber (~1.25 cups), peeled, seeded, and chopped
  • a handful cilantro, chopped, plus several sprigs for garnish
  • 1 lemon or lime, juiced
  • 1 teaspoon salt
  • 1/4 teaspoon ground black pepper
  • avocado slices (optional)
  • GF tortilla chips for serving (optional)

Instructions

  1. Place salmon in a bowl. Add scallions, tomato, cucumber, cilantro, and drizzle with lemon or lime juice and combine.
  2. Season with salt and pepper.
  3. Refrigerate for 20 minutes to allow the flavors to meld.
  4. To serve, top with fresh sliced of avocado and serve with GF corn tortilla chips.

Easy Poached Eggs

A poached egg sitting on top of home fries.
A compact, round poached egg with no strings.

I recently learned a game-changer technique for making perfect poached eggs. It takes a little more time, but the results are fantastic. The trick is a 15-minute soak in vinegar water. The vinegar helps keep the egg from losing shape and getting stringy. And no, it doesn’t make the egg taste like vinegar as long as you don’t soak for more than 15 minutes. For best results, soak each egg separately.


Easy Poached Eggs

Ingredients

  • eggs
  • vinegar (any kind except balsamic)
  • water

Instructions

  1. Add vinegar and water in equal proportions to a small bowl. Crack one egg into the bowl. Set aside. Set a timer for 15 minutes.
  2. After about ten minutes have passed, place a saucepan filled with water on high heat. Allow the water to come to a rolling boil, then reduce the heat so the water is at a gentle simmer.
  3. After 15 minutes is up, use a large spoon or slotted spoon and carefully transfer an egg from its vinegar soak. Allow the egg to cook until desired doneness is reached – between 3-5 minutes. (3 minutes delivers solid whites with a completely liquid yolk – the classic way to serve poached eggs.)

Low FODMAP Omurice

Omurice (o-muraisu) is a type of yōshoku or Western-style Japanese food. It’s basically a fried rice-filled omelet flavored with ketchup. It’s popular with kids and adults alike. It’s eaten for all meals of the day. It does have a distinct ketchup flavor so if you are not a fan of ketchup, use half the ketchup and all of the oyster sauce. If you really love ketchup or want the most authentic version, leave out the oyster sauce.

Omurice with a splash of ketchup on a plate.
“Football shaped” Omurice with low FODMAP ketchup.

Please keep in mind that if you are using regular American ketchup, you may use up to 2 teaspoons safely so do not add more ketchup after cooking. If using low FODMAP ketchup you can add a decorative drizzle of ketchup to the cooked omelet for garnish and flavor. Low FODMAP ketchup can be made at home (just search for recipes) or it can be purchased from vendors who specialize in low FODMAP products such as FODY.

When selecting frozen vegetables for the rice filling, be sure to pick veggies that are low FODMAP blends. Avoid peas and snow peas, which are often found in vegetable medleys. If making more than 1 serving of omurice, you can make the rice filling at the same time, but make the omelets separately. You can speed up the cooking process by using pre-cooked chicken for the fried rice.


Low FODMAP Omurice

Makes 1 serving

Ingredients

  • 3/4 cup cooked leftover white rice
  • 2 tsp either conventional or low FODMAP ketchup
  • 1/2 tsp soy sauce or gluten free tamari
  • 1 tsp oyster sauce (optional)
  • 1/8 tsp black pepper
  • sea salt
  • 1/2 bunch of scallions(green parts only), chopped
  • 1/4 cup frozen mixed low FODMAP veggies (carrot, green beans, corn ok – no peas!)
  • 1/2 Boneless skinless chicken thigh, chopped into 1/2” chunks (or 2 oz of cooked chicken meat)
  • 1 egg
  • 1 tbsp milk or water
  • 3 tbsp shredded cheddar cheese
  • 1 tbsp avocado or other neutral oil

Rice Filling Instructions

  1. Heat a large frying pan over medium heat and add oil. When it shimmers add the chicken, season with a little sea salt (to taste) and cook until no longer pink.
  2. Add the frozen vegetables, black pepper and scallions. Add the rice, breaking up any clumps. Add the ketchup, soy sauce and oyster sauce. Stir until well mixed.
  3. Remove from heat, cover and set aside.

Omelette Instructions

  1. Heat an omelette pan or small frying pan over medium high heat. While the pan is heating up, whisk together the egg and milk.
  2. Add the oil to the pan. When it shimmers, pour in the egg mixture and tilt the pan to coat the entire surface with egg. Cook until the bottom has set but the top is still soft. Lower the heat to medium low.
  3. Sprinkle the shredded across the omelette. Add the rice filling in an even line across the omelette. Use a spatula to fold both sides of the omelette over the middle to cover the fried rice. Carefully move the omurice to the edge of the pan. Holding a plate in one hand and the pan in the other, flip the pan to transfer the omurice, seam side down, onto the plate.
  4. If desired, cover the hot omelette with a paper towel and use your hands to form a kind of football shape. Remove paper towel. Serve immediately.

Individual Deviled Eggs

A pic of deviled eggs topped with paprika

Sometimes you want deviled eggs, but you don’t feel like making a big batch. I wrote this recipe for one deviled egg for those occasions. Eggs are high in protein and contain no carbohydrates. They’re also nutritious and easy on the stomach. That makes them an ideal meal or snack.

I keep a small supply of hard boiled eggs in my fridge. However I have noticed that it gets pretty boring eating a plain boiled egg all the time. It’s nice to dress them up with a little mayonnaise and mustard once in a while. When the egg is already boiled, making deviled eggs goes very quickly.

Deviled eggs can also be an opportunity to get creative. Try topping them with black or green olives, capers, chopped cornichons, smoked salmon, crumbled bacon, fresh herbs or sliced scallions.

Makes 1 serving.

Ingredients

Instructions

  1. Carefully slice the egg in half. Pull apart the cooked whites and set aside. In a small bowl, mash the yolk with a fork. Add mayonnaise and mustard. Mix until even.
  2. Using 2 spoons, fill egg white halves with the yolk mixture. Lightly sprinkle paprika over the eggs. Set in fridge to chill for 30 minutes or serve immediately.

Low FODMAP Mini Crustless Quiche

A photo of a quiche baked in a ramekin
Almost done.

Mini quiches make an easy anytime meal with minimal prep. Since they’re baked in the oven, you can focus on other things while they cook. They make a great dinner for one person. You can also customize the fillings of individual quiches to suit various dietetic needs if prepared for a group. Make-your-own-quiche bar at brunch, anyone?

Switch up the fillings with other low FODMAP ingredients to create different flavor experiences. Variations to try follow the recipe.


Makes 1 serving.

Ingredients

  • 2 eggs
  • 2-3 tbsp lactose free milk
  • butter or oil for greasing ramekin
  • ~ 1-2 tbsp protein (sliced deli turkey, smoked salmon, seasoned ground beef, bacon or ham) , optional
  • 1 raw broccoli floret, finely chopped
  • 1 scallion, sliced
  • 1-2 grape tomatoes, chopped
  • shredded cheddar cheese
  • sea salt
  • freshly ground black pepper
  • pinch of nutmeg (optional)

Instructions

  1. Preheat oven to 350F. Grease ramekins to prevent sticking. Spread your protein and veggies in the bottom of the ramekin. Add a small handful of shredded cheese (to taste).
  2. Whisk together egg and milk until even. Season with a pinch of sea salt and a few cracks of black pepper. Add nutmeg if using. Pour into ramekin.
  3. Place ramekin directly on the rack in the oven. Bake 25-30 minutes until the center of the quiche is set. Serve hot or chilled.

Try other low FODMAP variations:

  • feta with sautéed spinach and scallions for a Greek taste
  • taco meat with tomatoes, scallions, bell pepper and cheddar for Tex-mex
  • bacon, scallions and Gruyère or Swiss cheese for classic quiche Lorraine
  • fresh or dried herbs are another tasty addition; thyme is particularly good with eggs. Dill is another herb with an affinity for eggs.

Low FODMAP Japanese Curry Hash Browns

A photo of curry hash browns on a plate.

This recipe is meant to mimic the flavor of Japanese curry potato croquettes without the mess and hassle of deep frying. It starts with frozen hash browns for ease. Carrots are quickly and easily shredded with a shredding peeler. You may wish to omit the sugar, but it really makes it taste authentic. (As a Japanese friend of mine says, Japanese cooks put sugar in everything. ) It should be lightly sweet.


Makes 2 servings.

Ingredients

Instructions

  1. Heat a cast iron skillet over medium-high heat. Combine the frozen hash browns, shredded carrot, garlic-infused olive oil, sugar and curry powder in a mixing bowl. Toss until well mixed.
  2. Add the avocado oil to the skillet. When it starts to shimmer add the potato mixture and pack down tightly into a patty. Cover and cook just until the perimeters start to get lightly crispy, about 5 minutes.
  3. Use a spatula to press the top down then flip. Cook, uncovered, until the bottom is golden and crispy, another 3 to 5 minutes.

Low FODMAP GF Breakfast Tacos

A top down photo of 2 breakfast tacos on a plate
Scrambled eggs, tomatoes, green onions and cheese breakfast tacos.

There are dozens of ways to make a breakfast taco. Feel free to try all kinds of low FODMAP taco fillings. Despite corn containing a fair amount of polyols and oligos, up to 3 small corn tortillas should be tolerated. If you tolerate chili peppers or hot sauce, you could give your tacos a nice spicy kick.

Breakfast tacos come together quickly and easily, making them ideal for low energy days. They’re also a great meal for one. Keep an eye on how much tomato you include. Monash University recommends no more than 3 cherry tomatoes or half a regular tomato (about 2 oz).


Makes 1 3-taco serving.

Ingredients

  • 3 taco-sized GF white corn tortillas
  • a few handfuls of shredded Mexican cheese blend
  • 1-2 scallions (green parts only), sliced
  • 3 cherry or grape tomatoes, quartered
  • 2 eggs
  • 1 tbsp butter
  • sea salt and black pepper

Optional toppings – choose 1-3

  • cubed, seasoned and roasted potatoes
  • hash browns
  • red, orange or yellow bell pepper, diced
  • sliced avocado (if tolerated)
  • fresh cilantro
  • bacon, crisp-cooked and crumbled
  • diced ham
  • low FODMAP sausage crumbles
  • seasoned ground beef
  • low FODMAP pico de gallo

Instructions

  1. Preheat oven or toaster oven to 400F. Move oven rack to the highest position.
  2. Place three tortillas on a foil-lined baking sheet. Top each with shredded cheese, being sure to get close to the edges. When the oven is ready, put tortillas in the oven and bake until the cheese is completely melted but not browned. Bubbly is ok. Depending on your oven it can take 3-5 minutes.
  3. Meanwhile heat a pan over medium low heat. When it’s hot add the butter and swirl to coat the pan.
  4. Beat the eggs. When the butter is just barely bubbling, add the eggs to the pan directly in the center so that the butter gets pushed out to the sides.
  5. Watch for the edges to just barely start to set, and then gently swipe a spatula around the edges of the pan to create large soft curds. Don’t flip the curds over. Continue this process, pausing in between to allow time for the eggs to cook but working quickly enough so as not to overcook the eggs, just gently pushing/folding the liquid eggs to form curds. The entire process should take 2-3 minutes. Remove from heat promptly and set aside.
  6. Remove the tortillas from the oven. Divide eggs into three equal portions. Top each tortilla with eggs. Sprinkle each tortilla with scallions. Season with salt and pepper.
  7. Now is the fun part – you can fill the tacos with whatever you like. My go-to is chopped tomatoes and a spring of cilantro, but any of the optional toppings is sure to be a hit. It’s tempting to go nuts, but you want to be able to pick up your tacos so keep your fillings to a reasonable amount. Sometimes I skip the eggs and simply enjoy cheese and veggies. Don’t be afraid to get creative. Once loaded up, use a spatula to transfer to a plate and fold into a taco shape. Serve and enjoy!
A top down photo of 2 tacos stuffed with tomatoes, scallions and bacon
Melted cheese, crispy bacon, sliced tomatoes and green onions
A top down photo of tacos stuffed with scrambled eggs and salsa cruda
Scrambled eggs, cheese and low FODMAP Pico de Gallo

How to Boil Eggs

A photo of boiled eggs sliced in half with ground pink peppercorns and kosher salt sprinkled over them on a white background

It should be dead simple to boil an egg and it is – to just boil it. Boiling a nice-looking egg with the yolk just the way you like it isn’t always so easy. Nature can be uncooperative and we wind up with eggs scarred and pockmarked from sticking to the shell. Sometimes we get the timing wrong and wind up with a yolk that isn’t the right consistency. Fear not! I can help. This is my tried and true technique for getting nice smooth boiled eggs with perfect yolks.


Ingredients

  • eggs
  • water

Instructions

  1. When boiling eggs, fresh is not your friend. Eggs that have sat longer have had more time for the inner membrane to separate from the shell. This allows the shell to come off much more easily during peeling. If you know you want to make many boiled eggs at once, it usually best to buy the eggs a week or so in advance.
  2. Though it isn’t completely necessary, allowing eggs to warm up on the counter just bit can discourage cracking in the water. 5 minutes is usually enough.
  3. Fill a pot with enough water to cover the eggs and bring it to a boil. Use a slotted spoon to place eggs in the boiling water. Take care as sometimes cold eggs will crack when they touch the hot water. Allowing steam to warm them a bit before submerging them can help prevent cracking.
  4. Adjust the heat so that the water is at a steady medium boil.
    • For hard cooked eggs, allow them to cook for 12-13 minutes.
    • For ‘jammy’ yolk eggs, allow them to cook for 6.5 minutes.
    • For soft cooked runny-yolk eggs, allow them to cook for 5 minutes.
  5. Remove the eggs promptly and plunge into cold water. This will stop the eggs from cooking so that the yolks do not discolor. Allow them to cool for 2-5 minutes.The shells should come off easily without sticking to the white. On some occasions I will get a stubborn egg that refuse to cooperate, but by and large this will give you nice, smooth boiled eggs to enjoy as they are or in a recipe.

Low FODMAP Smoked Salmon Hash

A photo of a strip of hot smoked salmon on a white background

I first discovered smoked salmon hash on a trip to Boise at Goldy’s, which is a fabulous little breakfast cafe. Unsurprisingly, potatoes are the star of many menus in Idaho so you’ll find variety of potato hash dishes. I absolutely love smoked salmon and I love potatoes so it was the easy choice for my breakfast. My version is a satisfying low FODMAP meal that can also work for dinner. You can turn it into a fancier brunch dish by topping it with Easy 2-Minute Hollandaise sauce.

When selecting hot-smoked salmon for use in this dish, choose wild-caught, no color added, alder plank smoked salmon. Be sure that any seasonings are low FODMAP. If you can’t find alder plank smoked, regular hot smoked is fine. Learn more about the difference between hot-smoked salmon, lox and nova here.


Makes 2 servings.

Ingredients

  • 1 tbsp butter, olive oil or ghee
  • 8oz alder plank smoked salmon, cut into bite-sized chunks
  • 2-3 large Yukon gold potatoes, 1/2″ dice
  • 4 eggs, poached, soft-boiled or fried
  • 2 tsp capers, drained
  • 2 scallions, green parts only, chopped
  • 1-2 tsp fresh chives, chopped (optional)
  • Hollandaise Sauce (optional)

Instructions

  1. Heat oil or fat in a large skillet.  Add diced potatoes and season well with salt and pepper.  Cook over medium-high heat for about 20 minutes or until just tender.
  2. Add salmon, scallions and capers and cook for about 5 more minutes until heated through.
  3. Remove from heat, divide into 2 servings and mound on plates.  Top each with 2 eggs.  Sprinkle generously with chives.

Easy 2-Minute Hollandaise Sauce

This amazing hack requires a microwave and a bit of uncultured dairy. If you don’t tolerate dairy well, use lactose-free half-and-half. Refrigerate any leftover sauce in an airtight container for up to 2 days. Reheat in the microwave for about 15 seconds.

Makes enough for 2 servings.

Ingredients

  • 4 tablespoons (1/2 stick) unsalted butter
  • 2 large egg yolks
  • 1/2 medium lemon
  • 1/4 cup half-and-half
  • 1/2 teaspoon Dijon mustard
  • pinch of salt (or to taste)

Instructions

  1. Place 4 tablespoons unsalted butter in a 2-cup glass measuring cup or medium microwave-safe bowl. Microwave on high until mostly melted, 30 to 45 seconds. Stir until the butter is completely melted. 
  2. Place 2 large egg yolks in a small bowl and whisk with a fork. Squeeze the juice from 1/2 medium lemon. Add the yolks, 1 tablespoon of the lemon juice, and 1/4 cup heavy cream or half-and-half to the melted butter and stir until combined.
  3. Microwave in 15-second bursts, whisking between each burst, until slightly thickened but still pourable (about 185ºF), 1 to 1 1/2 minutes total.
  4. Add 1/2 teaspoon Dijon mustard and whisk to combine. Taste and season with more lemon juice and salt as needed. Serve warm.