How to Hamburger Patties from Frozen

A burger sitting on a plate

If you’re like me forgetting to thaw something for dinner is a weekly event. Luckily it’s possible to cook frozen hamburger patties without thawing them first fairly quickly and easily. Of the two methods presented here, I prefer to pan fry burgers as I like the texture a little better. However broiling can be great on days when standing at the stove while the meat cooks isn’t an option.

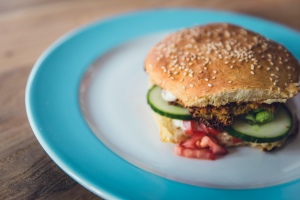
True sourdough is tolerated by many low FODMAPers. Look for products that have been naturally fermented. (Usually if there’s no yeast in it it’s a good clue.) If you don’t tolerate sourdough, you can briefly heat 2 taco-sized corn tortillas then cut the burger patty in half and tuck one half into each tortilla. Add toppings as desired. You can also make a lettuce wrap for your burger with butter lettuce if tortillas don’t sound appealing. The cucumbers are a nice stand in for pickles, which are often not low FODMAP. However if you aren’t in the elimination stage and tolerate dill pickles, you can use those instead.

If you wish to add cheese, add it about 3 minutes before the end of cooking. If using the stovetop method, cover the pan with a lid while the cheese melts.

If you are trying to eat low-histamine, as long as the patties were flash frozen when fresh, these cooking methods should produce lower histamine meat than if thawed ahead of time.


The EZ- burger

Makes 1 burger

Ingredients

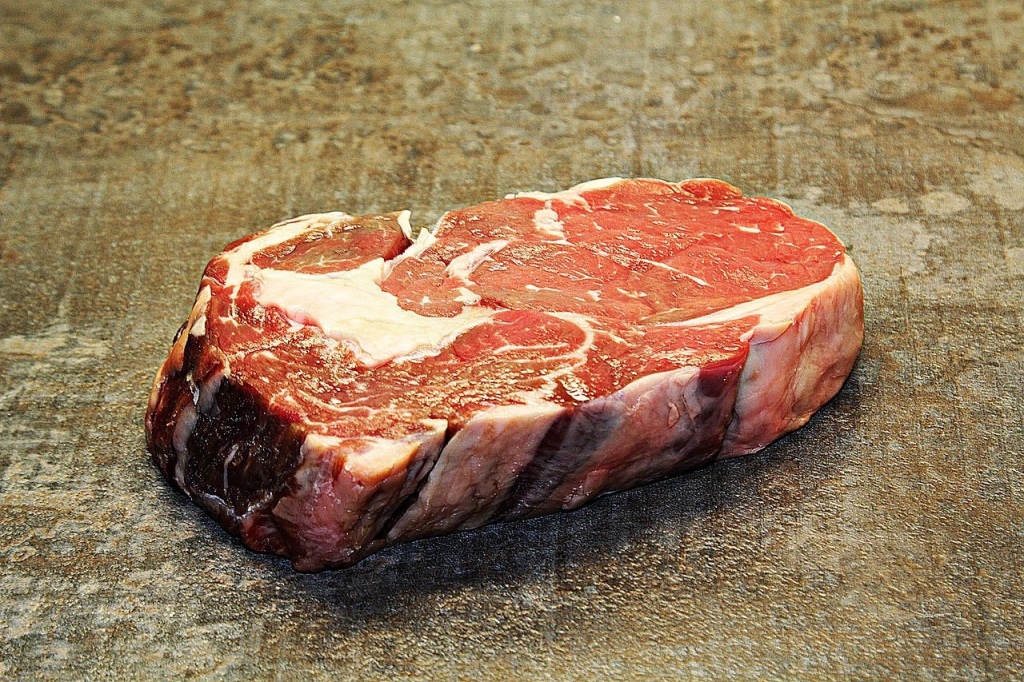
  • 1 (1/4 lb) frozen hamburger patty
  • Sourdough bun (if tolerated)
  • 1 tomato slice (optional)
  • 1 tbsp mayonnaise (optional)
  • 1/4 tsp low FODMAP ketchup optional)
  • 1-2 slices cucumber optional)
  • Romaine lettuce or butter lettuce (optional)
  • Sea salt and black pepper

Instructions

Method 1: Pan Frying

  1. Heat a skillet over medium high heat. When it is hot enough to make a few drops of water sizzle, add the frozen burger patty. Give it a crack of black pepper and a sprinkle of salt.
  2. Meanwhile mix the mayonnaise and ketchup in a small bowl until even to make burger sauce.
  3. Allow the patty to cook undisturbed until the juices start to seep from the top .
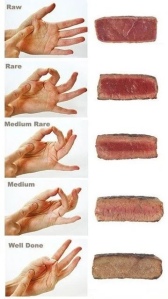
  4. Give it another minute or so and then flip. Just as before, allow the patty to cook undisturbed until her again the juices start to seep from the top of the burger. Allow to cook for another 1-2 minutes. (This should produce a medium burger. You may need to try this method a few times and adjust cooking times to reach the desired doneness.)
  5. Remove patty from pan and allow to rest for about 2-3 minutes. Top with the burger sauce, cucumbers, tomato and lettuce. Serve.

Method 2:Broiling

  1. Set broiler to high and preheat for at least 5 minutes. Arrange the rack so that the burger patty itself will be about 4” from the heating element.
  2. Prepare a broiling pan or cast iron skillet by lining it with aluminum foil.
  3. Place the frozen patty in the center of the pan and give it a crack of black pepper and a sprinkle of salt. Put the pan in the oven on the top rack. Leave the oven door open. If you have a kitchen fan, it’s a good idea to turn on now.
  4. Broil for 5-7 minutes. Remove the pan from the oven and flip the patty. It may sill be pink on the underside. That’s ok.
  5. Meanwhile mix the mayonnaise and ketchup together in a small bowl until even to make burger sauce.
  6. Return the burger to the oven and broil for another 5-7 minutes. This should produce a a medium burger. However it may take some experimentation to get perfect doneness as all ovens are a little different.
  7. Remove patty from pan and allow to rest for about 2-3 minutes. Top with the burger sauce, cucumbers, tomato and lettuce. Serve.

Easy Poached Eggs

A poached egg sitting on top of home fries.
A compact, round poached egg with no strings.

I recently learned a game-changer technique for making perfect poached eggs. It takes a little more time, but the results are fantastic. The trick is a 15-minute soak in vinegar water. The vinegar helps keep the egg from losing shape and getting stringy. And no, it doesn’t make the egg taste like vinegar as long as you don’t soak for more than 15 minutes. For best results, soak each egg separately.


Easy Poached Eggs

Ingredients

  • eggs
  • vinegar (any kind except balsamic)
  • water

Instructions

  1. Add vinegar and water in equal proportions to a small bowl. Crack one egg into the bowl. Set aside. Set a timer for 15 minutes.
  2. After about ten minutes have passed, place a saucepan filled with water on high heat. Allow the water to come to a rolling boil, then reduce the heat so the water is at a gentle simmer.
  3. After 15 minutes is up, use a large spoon or slotted spoon and carefully transfer an egg from its vinegar soak. Allow the egg to cook until desired doneness is reached – between 3-5 minutes. (3 minutes delivers solid whites with a completely liquid yolk – the classic way to serve poached eggs.)

Low FODMAP TexMex Seasoned Ground Beef

Seasoned ground beef has all kinds of applications. From taco filling to salad topping to quiche ingredient, ground beef provides protein and flavor to whatever you’re making. Make a full pound and use it for a week of meals. Make School Lunch Tacos. Add it to Queso. Put it in Breakfast Tacos or Pan Fried Tacos.

A taco made with seasoned ground beef

Please note that regular supermarket chili powder often contains small quantities of garlic and onion. Low FODMAPers can keep portion sizes very small, replace the chili powder with paprika, or use chili powder that does not contain garlic and onion. You can find brands that do not contain garlic/onions by searching online.


Low FODMAP TexMex Seasoned Ground Beef

Makes 1 lb.

Ingredients

  • 1 lb ground beef
  • 1 tbsp garlic-infused olive oil
  • 1 bunch scallions, sliced (green parts only, optional)
  • 1 tbsp chili powder (optional, see above for info)
  • 2 tsp ground cumin
  • 1 tsp paprika
  • 1 tsp coriander
  • 1 tsp black pepper
  • 1/4 tsp oregano
  • 1/8 tsp sea salt
  • 1 tsp cornstarch
  • 1 pack low FODMAP beef broth concentrate
  • 1/2 cup water plus 2 tbsp water, divided

Instructions

  1. Heat a cast iron skillet over medium-high heat. Add the ground beef and 2 tbsp water. Cook the beef, stirring and breaking up the meat, for 5-6 minutes. Pour off excess fat and water. Stir in garlic-infused olive oil and cook for another minute.
  2. Add the chili powder, cumin, paprika, coriander, pepper, oregano, salt, cornstarch and scallions. Stir until well combined. Add the water and broth concentrate, stir, bring to a simmer and cook uncovered until thickened, about 4-5 minutes.

Individual Deviled Eggs

A pic of deviled eggs topped with paprika

Sometimes you want deviled eggs, but you don’t feel like making a big batch. I wrote this recipe for one deviled egg for those occasions. Eggs are high in protein and contain no carbohydrates. They’re also nutritious and easy on the stomach. That makes them an ideal meal or snack.

I keep a small supply of hard boiled eggs in my fridge. However I have noticed that it gets pretty boring eating a plain boiled egg all the time. It’s nice to dress them up with a little mayonnaise and mustard once in a while. When the egg is already boiled, making deviled eggs goes very quickly.

Deviled eggs can also be an opportunity to get creative. Try topping them with black or green olives, capers, chopped cornichons, smoked salmon, crumbled bacon, fresh herbs or sliced scallions.

Makes 1 serving.

Ingredients

Instructions

  1. Carefully slice the egg in half. Pull apart the cooked whites and set aside. In a small bowl, mash the yolk with a fork. Add mayonnaise and mustard. Mix until even.
  2. Using 2 spoons, fill egg white halves with the yolk mixture. Lightly sprinkle paprika over the eggs. Set in fridge to chill for 30 minutes or serve immediately.

Low FODMAP Basic Baked Risotto

Risotto on a white plate

Risotto? In the oven? That’s correct. You can make delicious, creamy risotto effortlessly by baking it. No more standing over the stove stirring! The oil and butter float to the top, bringing the leek along with it. The leek then lightly self-sautés in the oil layer so be sure it is sliced very thinly. Simply dump everything in a casserole, stir a few times and bake. After it’s cooked, a few moments of vigorous stirring turn what looks like watery rice into the risotto we know and love. This method makes a usually labor-intense meal suitable for low energy days. What’s even better is that this type of risotto reheats very well in the microwave. Just cover and add a little water.

This recipe is intended to be a side dish or a blank canvas for your own risotto. Serve as-is alongside salmon, chicken or steak with a vegetable for a complete meal.


Makes 4 side dish servings.

Ingredients

  • 1 1/2 cups Arborio rice
  • 4 cups low FODMAP chicken broth
  • 1 leek, finely sliced
  • 1 tbsp garlic-infused olive oil
  • 3 tbsp unsalted butter, divided, cut into 1/2″ pieces
  • 1/2 tsp black pepper
  • 1/3 cup parmesan cheese, grated
  • 1/4 cup white wine for cooking

Instructions

  1. Preheat oven to 350°F. Using your method of choice, heat the broth until almost boiling.
  2. Pour the broth into a small casserole (about 10″ wide). Next add the rice, 1 tbsp of butter pieces, garlic-infused olive oil, leeks, and black pepper. Cover with lid or foil, bake 35 minutes or until rice is just cooked.
  3. Remove from oven. Don’t panic. It will not look quite right. Stir a few times to break up rice and activate the starch. Add finishing 2 tbsp of butter pieces, parmesan and wine then stir vigorously until the watery rice becomes creamy.
  4. If the risotto is too thick, add 1 tbsp of boiling water at a time to loosen it up, stirring well after each addition. Serve immediately.

Low FODMAP Salad Building 101

A green salad can be a surprisingly easy meal to make, especially if you have leftover cooked meats in the fridge. There’s a simple formula to follow:

greens + veggies + proteins + dressing = yum

Let’s break this down into low FODMAP choices and portion sizes. All of the following portion recommendations are for a single portion, as reported by Monash University’s FODMAP app.

A photo of a salad in a white bowl

Salad Greens

Because most greens do contain some FODMAPS, it is important to make sure to not exceed recommended portions. For dinner salads, select greens that you can have in quantity such as Romaine or red leaf lettuce. You can also use greens in combination for taste or nutrition. For side salads there is more freedom to choose since you can use higher FODMAP greens in smaller portions. Feel free to use ready to eat salad greens to save time and effort.

The following types of lettuce are the lowest FODMAP choices. Up to 2 cups of the following should be tolerated.

A photo of romaine lettuce on a white background
  • Romaine lettuce
  • Red leaf lettuce
  • Butter lettuce
  • Bibb lettuce
  • Arugula/Rocket
  • Radicchio

Higher FODMAP greens that can be enjoyed in smaller portions include:

  • Baby spinach (up to 1.5 cups)
  • White cabbage ( up to 3/4 cup)
  • Kale (up to 1/2 cup)

Low FODMAP Vegetables

Fresh vegetables add color, texture and nutrition to a salad. Slice them with a mandolin, chop them with a knife or use a peeler/grater. Unsure of how much to use? Go with whatever looks nice to you. I build all my salads by how they look.

  • Carrot, peeled and sliced or grated (up to 1 medium carrot)
  • Red bell pepper, sliced or chopped (up to 1/2 cup)
  • Cherry tomatoes, halved or quartered (up to 3)
  • Cucumber, sliced into rounds (up to 1/2 cup)
  • Radish, sliced into rounds (up to 4 radishes)
  • Scallions, sliced (green parts only)
  • Black olives, whole or sliced (up to 15)
  • Jicama, peeled and medium diced (up to 1/2 cup)

Proteins

Turn a salad into a satisfying meal by adding the protein of your choice. Meats and eggs are low FODMAP so use them in whatever quantities you like. I typically use between 4-6 oz portions of leftover meats I have already cooked. If you plan on cooking your protein freshly, be sure to let it stand long enough too cool or it will wilt your greens. Poached or grilled chicken or fish works well for salads.

  • Marinated firm tofu (up to 1 cup), diced
  • Hard boiled egg, cut into wedges
  • Sautéed shrimp
  • Salmon
  • Hot/cold smoked salmon
  • Chicken, sliced or diced
  • Bacon (up to 2 strips)
  • Ham, diced
  • Steak, sliced
  • Seasoned ground beef crumbles
  • Hamburger steak, cut into strips

Cheese

Many cheeses are low FODMAP. Hard cheeses and aged cheeses contain less lactose than fresh dairy. Avoid fresh cheeses like cottage cheese or farmer cheese.

  • Parmesan, shredded or shaved (up to 1.5oz)
  • Cheddar, sliced, shredded or cubed (up to 1.5oz)
  • Swiss, sliced or cubed (up to 1.5oz)
  • Colby, sliced or cubed (up to 1.5oz)
  • Monterey Jack, sliced or cubed (up to 1.5oz)
  • Havarti, sliced or cubed (up to 1.5oz)
  • Mexican shredded cheese blend (up to 1.5oz)
  • Mozzarella, shredded (up to 1.5 oz)
  • Blue cheese crumbles (up to 1.5oz)
  • Feta crumbles (up to 3 tbsp)
  • Chèvre crumbles (up to 1 tbsp)

Putting It All Together – A Garden Salad for One

Once you’ve made your salad ingredient selections, it’s time for the dressing. Salad dressing is pretty easy to make and tastes infinitely better than bottled. Allow 2-3 ounces of dressing per meal salad. The 2 dressing recipes listed below are single ~2-ounce portions. Pick the one you prefer. Make sure to any prepared ingredients like ketchup and sweet relish do not contain high FODMAP ingredients like onion or garlic.

Garden Salad ingredients

  • Up to 2 cups Romaine lettuce, washed, dried and chopped
  • Hard boiled egg, cut into wedges
  • 1 medium carrot, shredded or sliced
  • 3 cherry tomatoes, halved
  • 6-8 cucumber slices
  • 1 radish, thinly sliced (optional)
  • 4 black olives (optional)
  • Handful shredded cheese

Basic Low FODMAP Vinaigrette Ingredients

  • 2 tbsp garlic-infused olive oil
  • 2 tsp red wine vinegar
  • 1/2 tsp Dijon mustard
  • a pinch of dried oregano or thyme
  • a pinch of sea salt
  • a few cracks of black pepper

Easy Thousand Island Dressing Ingredients

  • 1/4 cup real mayonnaise
  • 1 tsp ketchup
  • 1 tsp sweet relish
  • 1/4 tsp yellow mustard

Instructions

  1. Select the dressing you wish to make. Combine the ingredients for that dressing in a small bowl and stir until will mixed.
  2. Assemble the salad in a bowl. Pour the dressing over the salad. Serve immediately.

Makes 1 serving.

How to Cook Steak on the Stovetop

A photo of a raw ribeye steak on a mottled background

Since FODMAPs are only found in carbohydrates, meats are naturally FODMAP free. This makes meat ideal for days when you need something nutritious and sustaining, but gentle on the gut.

Pay attention to the fat content, cooking method and portion size when preparing a meat-centered meal. Higher fat cuts of meat, while delicious, can cause issues for those with gut issues. This is because fats can negatively affect gut motility. Because of that risk I recommend either preparing lower fat steaks such as sirloin or NY strip or cutting a higher fat rib eye in half. It can still satisfy without ingesting too much fat in one sitting. Leave any fat attached to the meat during cooking. It will make for a better final result. Be sure to discard any fat or gristle after cooking to help avoid gut discomfort.

There are a number of ways to cook steak. Some methods are pretty involved or take special equipment, but we are going to focus on the easiest methods in this post.

Safe Food Temperatures and Doneness

The proper temperature to cook a medium-rare steak to is 130 F to 135 F. However, according to the U.S. Department of Agriculture, beef should be cooked to at least 145 F (or above if desired). Keep in mind that the lower temperatures for rare and medium-rare meat are not recommended for people with vulnerable immune systems as it poses a risk of foodborne illness.

A visual guide to the hand test

The method I use is the ‘hand trick’ in which you compare the firmness of the steak to the firmness of different parts of your hand. First a disclaimer – there are natural variables that make this an imprecise method so consider it a helpful a guide more than a rule. Use a meat thermometer if you require safer food. It’s also not a bad idea to use a meat thermometer in conjunction with the hand test until you have experience. There are lots of in-depth guides to the hand trick on the internet if you want more information.

Steak/BeefSafe Temperatures
Rare120F – 125F
Medium rare130F – 135F
Medium140F – 145F
Medium well150F – 155F
Well done160F and above

The Very Easiest Steak

Get out your cast iron skillet. This super simple method works best with a heavy well-seasoned pan. Some recipes will have you bring meat up to room temperature, but for this method it’s fine to use it straight from the fridge. This method works best with sirloin or NY strip that is about 1-1.5” thick. You can also use ribeye but there is a different method I prefer for it which I will share after this recipe. (This method also works for cooking hamburger patties.)


Makes 1 serving.

Ingredients

  • 1 steak, cut about 1” thick
  • sea salt
  • freshly ground black pepper

Instructions

  1. Heat a cast iron pan over medium high heat.
  2. When the pan is hot, add the steak. Sprinkle a pinch of salt over the meat. Turn the heat down to medium and let it cook.
  3. When you can see the juices rising out of the meat, it’s time to flip it. Sprinkle with a little salt and a few cracks of black pepper. Allow the steak to cook for another few minutes.
  4. When you can see juices again, it’s time to test for doneness. Use the hand trick or a meat thermometer.
  5. When done, remove from the pan promptly and allow the steak to rest on a cutting board or warm plate for about 4 minutes before serving.

Steak with a Seared Crust (medium rare)

This method of cooking is ideal for rib eye steaks, which are nice with a little crust. For this technique we will be flipping the steak every minute. An oil with a high smoke point is required for searing on high heat. My choice is avocado oil. Please note that a cast iron skillet is also required for this method. Unlike the previous recipe, your meat should be at room temperature before starting. If working with frozen steaks, thaw in the refrigerator for about 24 hours before moving to the countertop.

Since it is the most popular temperature to cook a steak (also conveniently in the middle), these instructions are written for medium rare. Below are the cooking times for all levels of doneness.

  • Rare: 3 minutes total
  • Medium Rare: 4 minutes total
  • Medium Well: 5-6 minutes total
  • Well done: 8 minutes total

Makes 1 serving.

Ingredients

  • 1 ribeye steak, cut about 1” thick
  • 2 tsp avocado oil
  • 2 tsp unsalted butter
  • sea salt
  • freshly ground black pepper

Instructions

  1. Remove steak from refrigerator. Place on a plate and allow it to come to room temperature. (Do not skip this step.)
  2. Heat a cast iron pan (required) over high heat. Be sure it has heated completely.
  3. Drizzle the oil over the steak and sprinkle with about a 1/4 tsp each of salt and pepper (to taste). Massage the oil, salt and pepper into both sides of the steak.
  4. Lay the steak in the very hot pan. Cook for one minute and then flip. Repeat this 2 more times so that the total cook time comes to 3 minutes.
  5. Turn the heat off and add the butter. Cook for one more minute (4 minutes total), basting the steak with butter a few times. (If not using cast iron your pan will more than likely not retain enough heat. Instead of turning off, set to low heat.)
  6. When done, remove from the pan promptly and allow the steak to rest on a cutting board or warm plate for about 4-5 minutes before serving. (Technically you can rest a steak up to about ten minutes, but it will likely be cold by then.) Serve.

How to Poach Chicken

I admit that for the longest time any mention of poached chicken brought to mind a rubbery, flavorless puck of meat. I was never a fan. I never understood why anyone would actually want poached chicken. I thought it was simply a very easy cooking method that was irredeemably bad. I was wrong.

A photo of raw chicken breast on a black plate

Poaching chicken the right way makes all the difference in the world. Boiling chicken on high heat for too long will cause the meat to dry out. Instead, try one of these two methods of poaching to keep the meat juicy and delicious. They take a little extra time but are well-worth the effort. Why not give both methods a try and see which you prefer?

It is possible to flavor poached chicken with aromatics or broth. Add 3 slices ginger and 1 scallion (green parts only) to either of the pots below for the classic Chinese way to flavor poached chicken. Add a bay leaf, a few peppercorns, a sprig of thyme and 1 scallion (green parts only) for a more Western flavor.

Poached chicken is most often served shredded or sliced with sauce. It also used to prepare chicken for use in other recipes such as chicken salad.


Cold Start, Hot Finish

Ingredients

  • 1 pound skinless, boneless chicken breast or thighs
  • 1 teaspoon sea salt
  • 5-6 cups cool water
  • aromatics 

Instructions

  1. Add chicken, aromatics and salt to a medium pot. Cover with water by an inch or two, 5 to 6 cups.
  2. Place the pot over medium heat and heat until the liquid comes to a low simmer. This will take a few minutes. For the most tender poached chicken, don’t try to rush this step. It can take about 25-30 minutes.
  3. When the liquid is at a low simmer, turn down the heat to low and cook until the chicken is cooked through, 10 to 15 minutes. To check for doneness, an internal thermometer inserted into the thickest part of the chicken should read 165 degrees Fahrenheit, and the juices will run clear when you pierce the chicken with a knife.
  4. Transfer to a cutting board. Slice or shred and serve. If you do not plan on eating the chicken straightaway, skip the slicing and store tightly covered in the refrigerator. The chicken will keep 3 to 4 days in the fridge.

Hot Start, Cold Finish

Ingredients

  • 1-1.5lbs pound skinless, bone-in chicken breast or thighs
  • 1 teaspoon sea salt
  • 5-6 cups water
  • aromatics

Instructions

  1. In a medium pot, bring water to a boil. Lower the chicken into the pot, add aromatics and bring to a boil again. Reduce the heat to low, cover, and simmer for 10 minutes. The heat level should be just high enough so the water is moving, without any big bubbles or rolling water.
  2. After 10 minutes, turn off the heat, leave the lid on and let the chicken continue cooking in the warm pot for another 15 minutes.
  3. If you use boneless, skinless chicken breast, you can reduce the cooking time to 5 minutes, but still keep the chicken in the pot for 15 minutes after turning off the heat. To test if the chicken is cooked, pierce the thickest part of the chicken to make sure the juices run clear.
  4. Remove the chicken from the pot and place in ice water for 5 minutes to stop the cooking process and firm up the meat.
  5. Transfer to a cutting board. Slice or shred and serve. If you do not plan on eating the chicken straightaway, skip the slicing and store tightly covered in the refrigerator. The chicken will keep 3 to 4 days in the fridge.

Using Rice Noodles

Rice noodles are naturally gluten-free and low FODMAP not to mention delicious so I make them frequently. There are 2 types of rice noodles I prefer to use as they are available at the regular grocery store – rice vermicelli (aka angel hair) and rice fettuccine, both from A Taste of Thai. When preparing pasta as a main course, 2 oz of dry pasta should be allowed per serving, regardless of type.

Rice vermicelli, which is thin and round, is the star of Vietnamese noodle bowls. It also makes appearances in pasta salads, salad rolls, appetizers and stir-fries. Vermicelli noodles should be springy and light. Rice fettuccine is thicker and flat. It’s most recognizable as the ‘Phad Thai noodle’. It is a sturdy noodle that works well in stir-fries and soups.

Both types of noodles have special ways of preparing them. They do take a little time and planning to make properly, but the result is far better than a mushy, tangled mess. Cooked noodles can be added to soups about 3-5 minutes before removing from heat. They can also be stir-fried.

Preparing Rice Vermicelli for Dry Dishes

A photo of an uncooked package of rice noodles

Preparing the entire package will result in 5 cups of cooked noodles. The number of servings it makes depends on what type of dish and how many noodles make a serving. If using the noodles for a Vietnamese noodle bowl, it’s about 4 servings.

These noodles can be a little difficult to separate so I generally cook the entire package at once. If only half the noodles are needed, it is possible to carefully separate them into 2 halves. It can be messy however.

INGREDIENTS

  • 1 – 8.8 oz package of dry rice vermicelli noodles
  • warm water

INSTRUCTIONS

  1. Fill a large bowl with warm water. Place dry rice vermicelli in water and soak for 10 minutes. Drain well.
  2. Bring a large pot filled with 7 cups water to a rapid boil. Add the noodles and boil for 2-3 minutes. Stir gently with chopsticks to prevent sticking.
  3. Drain the vermicelli. Rinse with cold water to stop the cooking process. Drain well. Spin the noodles in a salad spinner to remove any excess water.
  4. Spread the noodles on a large plate and allow to air-dry for 15 minutes before serving.
  5. Refrigerate any unused noodles. To reheat, warm in the microwave using Low power. Consume within 1-2 days.

Preparing Rice Fettuccine for Stir-Fry or Saute

A photo of an uncooked package of rice noodles

Preparing the entire package will yield ~8 servings of a noodle-based dish like Phad Thai. These noodles are separate from one another so they are easy to subdivide them into smaller portions. Making these noodles for just one or two people is a breeze.

Rice fettuccine noodles also make an acceptable GF stand-in for egg noodles in chicken noodle soup. You can leave them long or trim them into shorter noodles after they have been soaked. Drop the soaked, trimmed noodles into hot soup just before it’s done and cook until al dente, about 3-5 minutes.

INGREDIENTS

  • 1 – 16 oz package of dry rice vermicelli noodles
  • hot tap water

INSTRUCTIONS

  1. Place noodles in a large bowl. Cover with very hot tap water. Stir to separate.
  2. Soak noodles for 15-20 minutes. Do not over soak. Drain noodles completely.
  3. Stir-fry noodles as your recipe directs until firm yet tender (al dente) and heated through, about 2-3 minutes.
  4. Refrigerate any unused noodles. To reheat, warm in the microwave using Low power. Consume within 1-2 days.

Simple Low FODMAP Pan-Roasted Chicken Thighs

When you can’t use aromatics like onions and garlic, texture becomes an extra important quality of food.  These chicken thighs are simple yet very satisfying due to their crispy skins. Serve promptly after cooking for crispiest skin. Pair with a green salad or roasted vegetables for an easy dinner.

A photo of 4 bone-in chicken thighs in a cast iron skillet

Makes 4 servings.

Ingredients

  • 4 skin-on, bone-in chicken thighs (about a pound)
  • Kosher salt and freshly ground black pepper
  • 1 tablespoon olive oil, butter or ghee

Instructions

  1. Preheat oven to 475°F. Season chicken with salt and pepper.
  2. Heat oil/fat in a 12″ cast-iron or heavy nonstick skillet over high heat until hot but not smoking. Nestle chicken in skillet, skin side down, and cook 2 minutes. Reduce heat to medium-high; continue cooking skin side down, occasionally rearranging chicken thighs and rotating pan to evenly distribute heat, until fat renders and skin is golden brown, about 12 minutes.
  3. Transfer skillet to oven and cook 13 more minutes. Flip chicken; continue cooking until skin crisps and meat is cooked through, about 5 minutes longer. Transfer to a plate; let rest 5 minutes before serving.