Low FODMAP Loaded Baked Potatoes

Loaded baked potatoes on a plate

In terms of actual effort, baked potatoes are among the easiest foods to prepare. They are not necessarily the quickest* meal to prepare. But when you have a lot of time but only a few spoons, they make an ideal dinner. (New cooking method added for microwave users! See the Time Saving Tip following the recipe to learn how to bake a potato in half the time.)

You can fry the bacon or it can be prepared by placing on a parchment-lined baking sheet in the oven and baking for 10-20 minutes at 425F. Broccoli florets can be chopped and steamed/boiled for about 2 minutes or microwaved. Both broccoli and bacon do contain FODMAPs so limit your intake to 2 broccoli florets and two strips of bacon, according to Monash.

Makes 2 servings.

Ingredients

  • 2 russet potatoes
  • 1 scallion, sliced (green parts only)
  • olive oil or garlic-infused olive oil
  • sea salt
  • shredded cheddar cheese or Mexican cheese blend
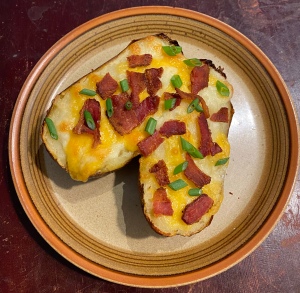
  • 4 strips sugar-free uncured bacon, fried crisp and crumbled (optional)
  • 4 broccoli florets, cooked and chopped (optional)
  • lactose free sour cream (optional)

Instructions

  1. Preheat oven to 425F. Scrub potatoes as necessary and dry. Pierce the potatoes a few times with a fork and lightly oil with olive oil. Lightly salt the potatoes and place directly on oven rack and bake for 45-60 min, until tender.
  2. Remove potatoes from oven and cut open the top. Place on a baking sheet. Sprinkle shredded cheese over the top of the potatoes. Return potatoes to oven until the cheese melts – about 3-5 minutes.
  3. Remove potatoes to serving plates. Top with crumbled bacon, broccoli and scallions. Serve with sour cream if desired.

*Time Saving Tip

In a hurry and have a microwave? Try this hybrid cooking method for the first portion of cooking. It reduces the cooking time by about half. Be sure to use the oven only to melt the cheese.

  1. Preheat the oven to 425 F. Pierce the potatoes with a fork, then microwave until easily pierced but slightly firm in the center, about12 minutes.
  2. Brush with olive oil and bake directly on the oven rack until tender with crisp skins, about 10 minutes.

Low FODMAP Chili-Mac

Makes servings 4-6 servings.

Chili-mac is a homey, comforting dish. Originally made by mixing prepared macaroni and cheese with prepared chili, this recipe skips ahead and makes everything at once. The result is an easy satisfying dish that comes together quickly – much like a from-scratch version of Hamburger Helper. You can substitute a medium tomato for the grape tomatoes if desired. A bunch of scallions can be substituted for the leeks.

A white bowl with a serving of chili mac in it.
It’s not pretty but it it’s pretty tasty!

It’s not the most beautiful dish, but it is a humble delight for those who love melted cheese with pasta. Though other pasta shapes can work, elbow macaroni or small shells are best. Please note that while the cheesy sauce reheats very well, gluten free pasta tends not to hold up. It will still taste great but the pasta may get mushy. For that reason, I try to make just enough so there are no leftovers.

Please note that chili powder usually contains small quantities of garlic and onion. Low FODMAPers can keep portion sizes very small, replace the chili powder with paprika, or use chili powder that does not contain garlic and onion. You can find brands that do not contain garlic/onions by searching online.

A pot of chili-mac cooking on the stove
Experimenting with rotelle pasta. Elbow macaroni works better.

Ingredients

Instructions

  1. Set a sauce pan over medium high heat and add the beef plus the water. Cook about 5-7 minutes, breaking the meat up as you go. When browned, pour off water and fat then return pan to the burner.
  2. Stir in the cumin, paprika, chili powder, garlic-infused olive oil, and black pepper. Add the leek and tomatoes. Stir in beef broth and set heat to high. Once boiling, add the pasta.
  3. Reduce the heat and simmer, uncovered, stirring occasionally, until the pasta is tender and most of the liquid has been absorbed – about 13-15 minutes.
  4. Remove pan from burner and stir in the cheese. Serve right away or cover and let it sit for about 5 minutes in order to allow the flavors to develop.